
Command Line Interface
The command line interface (CLI) provides a way to perform various administrative tasks related to the server.
Any interdiode container can be used to run a command, or a new container can be created for this purpose as long as the environment is properly configured.
System Configuration and Checks
check
Check the server configuration and report any issues. The complete list of checks can be found in the System Checks.
docker compose exec -it [CONTAINER] interdiode-ctl check [--fail-level {CRITICAL,ERROR,WARNING,INFO,DEBUG}]
configuration
Display or test the current server configuration.
docker compose exec -it [CONTAINER] interdiode-ctl configuration apply
Prepare the database and apply the current configuration to the database. This is required after changing the configuration variables, updating the server or when starting the server for the first time.
docker compose exec -it [CONTAINER] interdiode-ctl configuration [-v 2] environ
Display the current loaded configuration as environment variables.
docker compose exec -it [CONTAINER] interdiode-ctl configuration [-v 2] check
Display the current database state.
docker compose exec -it [CONTAINER] interdiode-ctl configuration [-v 2] check-logging [--level {CRITICAL,ERROR,WARNING,INFO,DEBUG}] [--message CUSTOM MESSAGE]
Emit log messages at the specified level to check the logging configuration.
docker compose exec -it [CONTAINER] interdiode-ctl configuration [-v 2] check-files [--sha512] [--remove-corrupted]
Check if all files referenced in the database are present. The checksum can also be verified.
If the --remove-corrupted option is used, any corrupted file will be deleted.
Attention
This operation can be time-consuming and should be used with caution.
docker compose exec -it [CONTAINER] interdiode-ctl configuration [-v 2] reset [--background | --transfers | --actions] [--no-input]
Clear the background or transfers queues, but do not interrupt current operations.
Attention
This operation cannot be undone and can be used if too many pending tasks are preventing the server from functioning properly. The various pending operations will need to be restarted after executing this command.
sendtestemail
Send a test email to the specified address or to all admins if --admins is used. This can be used to verify that the email configuration is working properly.
The admin email addresses are defined by the ADMINS environment variable.
docker compose exec -it [CONTAINER] interdiode-ctl sendtestemail [EMAIL@DOMAIN.TLD|--admins]
gpg
Process GPG keys. This command can be used to create, export or list GPG keys. GPG keys are used for signing private APT or YUM repositories.
docker compose exec -it [CONTAINER] interdiode-ctl gpg list [--onlyid]
List available GPG keys. If --onlyid is used, only the key IDs will be displayed.
docker compose exec -it [CONTAINER] interdiode-ctl gpg create [--length 4096] [--absent] [--onlyid] [--date 10y] [--name NAME] [--email EMAIL@DOMAIN.TLD]
Create a new GPG key. The key length, name and email can be specified.
If --absent is used, the key will not be created if a key already exists.
docker compose exec -it [CONTAINER] interdiode-ctl gpg select [key_id]
Select an existing GPG key to be used for signing. The key ID can be obtained from the list command.
Note
All workers must be restarted after changing the selected GPG key.
docker compose exec -it [CONTAINER] interdiode-ctl gpg export
Export the current default GPG key as an armored text block, beginning by BEGIN PGP PUBLIC KEY BLOCK.
User Configuration
changepassword
Change the password for a user. This command will prompt for the new password and confirmation.
docker compose exec -it [CONTAINER] interdiode-ctl changepassword [USERNAME]
createsuperuser
Create a new superuser account. This command will prompt for the username, an optional email and a required password.
Process Management
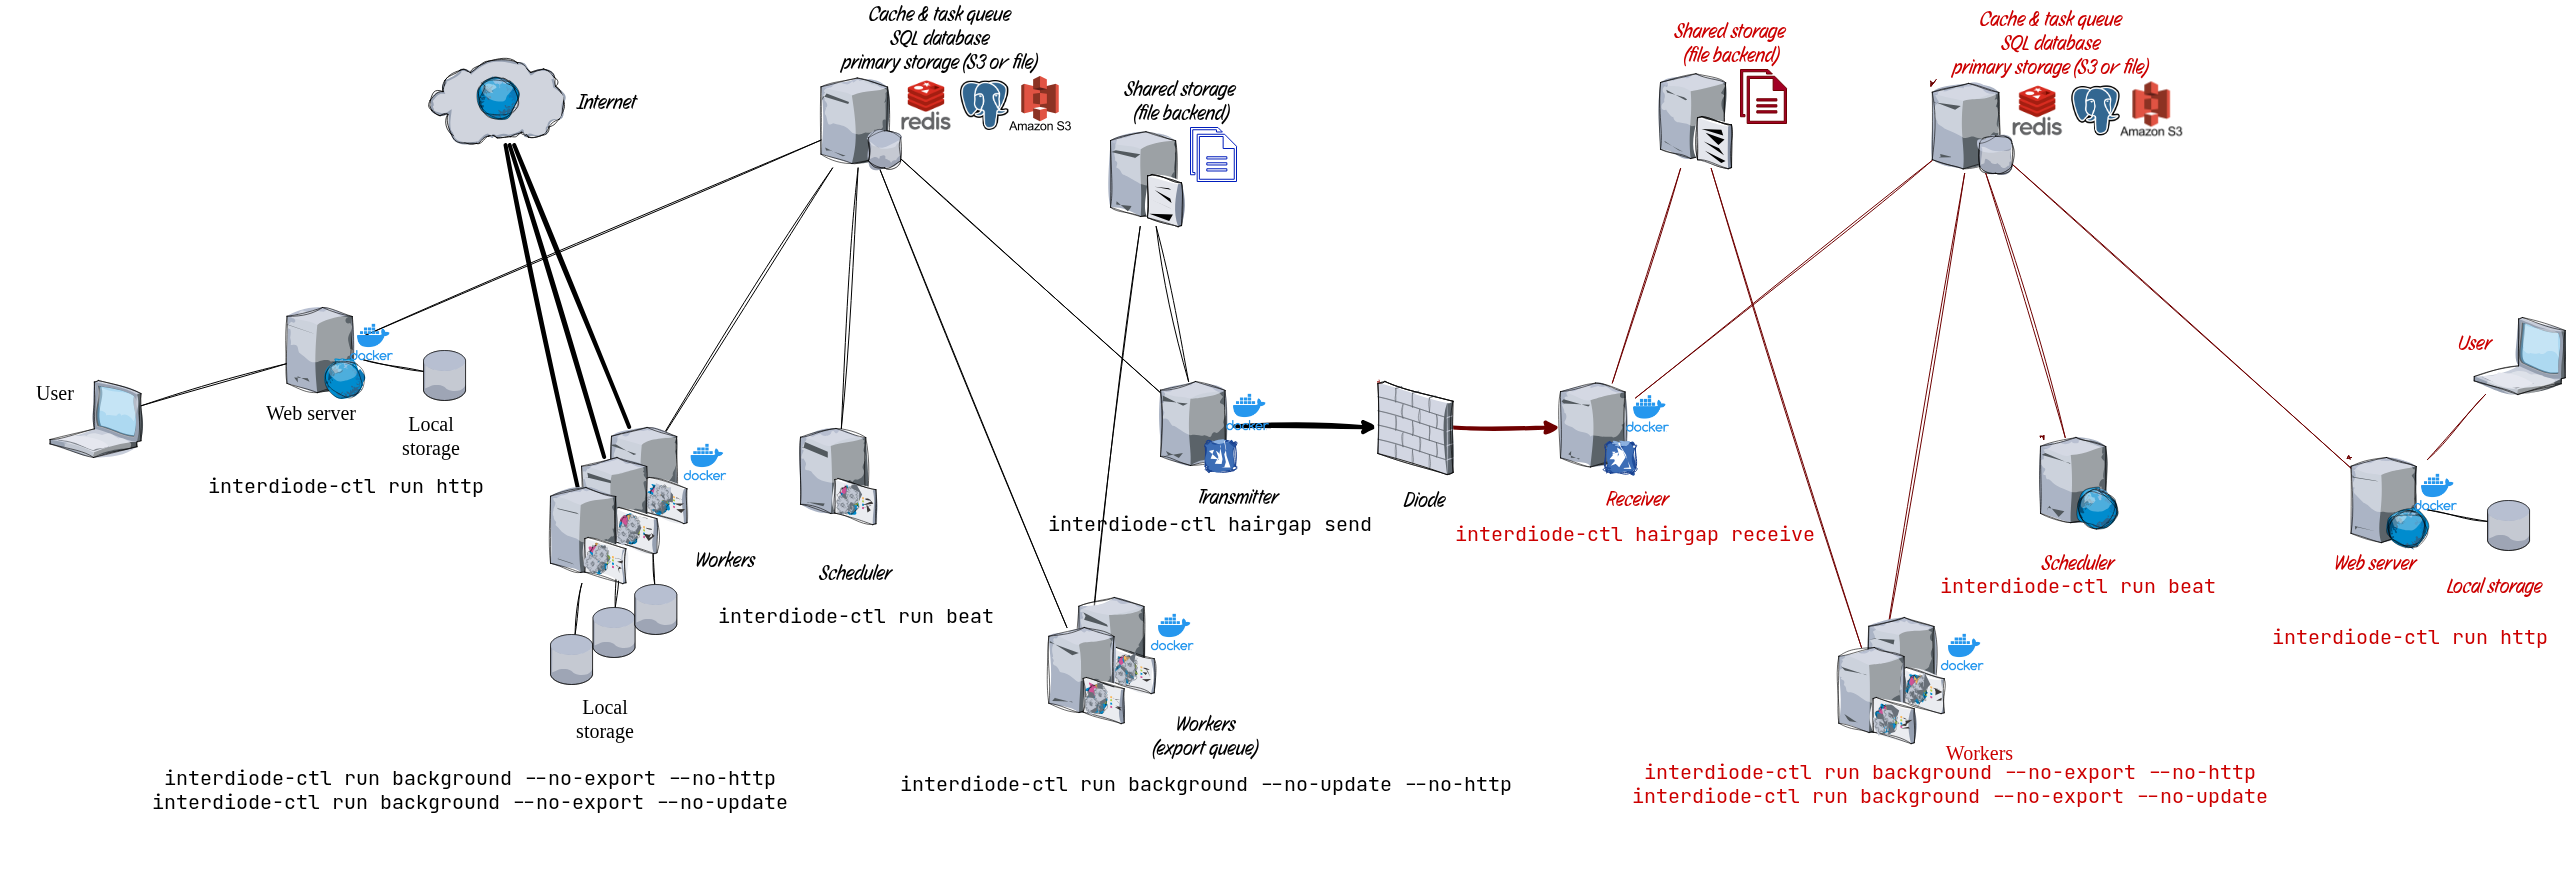
The following diagram presents the different processes and the commands needed to start them.
run
Run the main processes: HTTP server, background worker and beat scheduler. All theses processes can also export prometheus metrics on a separate interface/port. You can also launch upkeep tasks, which are used to perform regular maintenance operations such as cleaning up old files or sending email notifications.
interdiode-ctl run [--skip-db] [-v {0,1,2,3}] http [--http-timeout HTTP_TIMEOUT] [--websocket_timeout WEBSOCKET_TIMEOUT] [--websocket_connect_timeout WEBSOCKET_CONNECT_TIMEOUT]
Start the HTTP server, listening at LISTEN_ADDRESS environment variable.
the configuration apply command must have been run before starting the server for the first time to prepare the database and apply the configuration, but the --skip-db option can be used to start the server without checking if the database is ready.
interdiode-ctl run [--skip-db] [-v {0,1,2,3}] background [--no-export] [--no-http] [--no-update] [-w WORKERS] [--max-tasks-per-child MAX_TASKS_PER_CHILD] [--max-memory-per-child MAX_MEMORY_PER_CHILD]
Start a background worker to process background tasks. Any worker will process all types of tasks, but the --no-export, --no-http and --no-update options can be used to exclude certain types of tasks from being processed by this worker.
The maximum number of tasks before a worker is restarted can be specified with --max-tasks-per-child as well as the maximum memory usage with --max-memory-per-child, if ever a memory leak is detected in your configuration.
Any number of workers can be started and each of them can process different types of tasks. Some rules must be followed to avoid problems:
if a worker does not have access to the same shared cache as the
hairgap sendprocess, then the export tasks must be excluded from this worker with--no-export,update and export tasks can be very long to process, so you should exclude HTTP tasks from a worker that is not dedicated to processing them with
--no-httpto have better answer times from the interface,for the same reason, you should only allow the short HTTP tasks on a dedicated worker, started with both
--no-updateand--no-exportto avoid having long tasks blocking the processing of HTTP requests.
interdiode-ctl run [--skip-db] [-v {0,1,2,3}] beat [--max-interval MAX_INTERVAL] [--prometheus-interval PROMETHEUS_INTERVAL]
Start a scheduler to start scheduled background tasks like periodic update or export tasks. You have to ensure only a single scheduler is running for a schedule at a time, otherwise you’d end up with duplicate tasks.
The maximum number of seconds to sleep between schedule iterations can be defined with --max-interval, with a default to 5 seconds.
If you export Prometheus metrics, the beat scheduler will also export metrics about the scheduled tasks and their execution, and the interval for updating these metrics can be defined with --prometheus-interval with a default to 60 seconds.
Upkeep tasks can be automatically launched by the beat scheduler when the DAILY_UPKEEP environment variable is set to true.
interdiode-ctl run [--skip-db] [-v {0,1,2,3}] remove [--timeout TIMEOUT] [--kill] [--worker WORKER] [--queue {background,http,hairgap,transfer}]
Stop workers from consuming tasks from the task queues and wait for them to finish running tasks (or kill them if –kill is specified). This is the recommended way to stop the workers before killing containers, as it allows to finish processing current tasks and avoid data loss.
Note
Prometheus metrics can be exported by all processes. See Prometheus Metrics Export for more details.
hairgap
This command is used to start the processes responsible for sending and receiving data through the data diode, using either the UDP or the raw TCP protocol. This command is not required if you use the file export/import method, for example if you use your own data diode protocol.
interdiode-ctl hairgap [--skip-db] [-v {0,1,2,3}] receive
Start the network (UDP or TCP) receive process to receive data from the external (black) server. By definition, this process must be started on the internal (red) network. This process must also have access to the same shared cache as the background worker processing import tasks, otherwise the received data will not be available for export.
interdiode-ctl hairgap [--skip-db] [-v {0,1,2,3}] send
Start the network (UDP or TCP) sender process to send data to the internal (red) server. By definition, this process must be started on the external (black) network. This process must also have access to the same shared cache as the background worker processing export tasks, otherwise this process will not be able to actually send exported data.
Note
Prometheus metrics can be exported by these two processes. See Prometheus Metrics Export for more details.
interdiode-ctl hairgap [--skip-db] [-v {0,1,2,3}] import [--path PATH]
Import files that may have been received by the hairgap receive process or files that have been manually copied to the import directory.
By default, this import directory is <LOCAL_CACHE_DIR>/transfer/ but a custom path can be specified with the --path option.
This command is not required if you use the TCP or UDP transfer method, but you can use it after some transfer problems.
interdiode-ctl hairgap [--skip-db] [-v {0,1,2,3}] test-receive [--count COUNT] [--port PORT]
This command can be used to test the complete send/receive TCP or UDP process. It will start a temporary receive process that exits when the specified number of test files have been on the specified port.
interdiode-ctl hairgap [--skip-db] [-v {0,1,2,3}] test-send [--port PORT] filename
This command can be used to test the complete send/receive TCP or UDP process with an arbitrary file. The volume must be mounted in the container and the file must be specified with its path in the container. The file will be sent to the specified port and a temporary receive process must be started to receive it.
source
Manage data sources with several subcommands to update, prune useless data, prepare the transferred data or transfer them.
interdiode-ctl source [--skip-db] [-v {0,1,2,3}] update [--background] [--no-export] <UUID|'*'>
Force the update of the data source with the specified UUID, or all data sources if * is specified.
This command can be used to force the update of a data source without using the web interface.
The update can be launched in the background with the --background option, but the command will wait for the update to finish if this option is not used.
The --no-export option can be used to exclude the standard export to the red side after the update.
interdiode-ctl source [--skip-db] [-v {0,1,2,3}] export [--last LAST_DATETIME] [--first FIRST_DATETIME] [--tmp TRANSFER_TMP] [--dst TRANSFER_OUT] [--name EXPORT_NAME] [--background] [--no-transfer] <UUID|'*'>
Export selected data from the source with the specified UUID, or from all sources if * is given.
You can limit the most recent exported object with --last LAST_DATETIME and the oldest exported object with --first FIRST_DATETIME.
Expected date format is like 2019-05-17T17:44:32Z+0000, +3600s, -1h or +2d.
Data will be created in --tmp TRANSFER_TMP and moved to --dst TRANSFER_OUT when the export is finished.
You can also select the export name with --name EXPORT_NAME instead of a UUID.
The export can be launched in the background with the --background option, but the command will wait to finish if this option is not used.
The --no-transfer option can be used to exclude the transfer to the red side after the export: you need to manually transfer tiles.
interdiode-ctl source [--skip-db] [-v {0,1,2,3}] transfer [--background] input_abspath
Transfer the exported data from the specified input path to the red side. The input path must be the absolute path of the exported file on the black side, which is usually in the shared cache directory.
This path should be created by the interdiode-ctl source export command.
The transfer can be launched in the background with the --background option, but the command will wait to finish if this option is not used.
interdiode-ctl source [--skip-db] [-v {0,1,2,3}] prune [--background] <UUID|'*'> limit
Prune useless data from the source with the specified UUID (or from all sources if * is given) and actions older than the limit.
Deleted objects that are still present in the database will be deleted: be sure that the red server has received all data before pruning them from the black server, otherwise these data will remain on the red side.
Expected limit format is like 2019-05-17T17:44:32Z+0000, +3600s, -1h or +2d.